New Trampolines New Trampolines
IN-GROUND TRAMPOLINES:
We are now proud to offer quality Capital Play In-Ground Trampolines
- These are high quality trampolines, designed and manufactured in Europe for domestic use.
- Two models are available - 14' x 10' rectangular and 14' circular.
- Purpose built, high specification in-ground trampolines. Includes the retaining wall.
- Easy to self install with a complete kit for a perfect in-ground trampoline.
- High-grade mat and 8.5 inch springs provide a brilliant bounce.
- Patented vented pads to prevent pad slap noise and improve jump quality.
- Solid retaining wall made from eco-friendly recycled polypropylene/ethylene mix.
The kit is designed for DIY use and comes with excellent instructions.
14 foot x 10 foot RECTANGULAR IN-GROUND TRAMPOLINE
11 foot x 8 foot RECTANGULAR IN-GROUND TRAMPOLINE
14 foot CIRCULAR IN-GROUND TRAMPOLINE
12 foot CIRCULAR IN-GROUND TRAMPOLINE
For prices and availability please phone or email us
Freight: Freight charges are quoted individually and depend on your address. Please contact us.
Key Features:
 Frame: heavy duty 275gsm galvanised 42mm diameter, 2mm thick steel frame.
The frame is made from thick galvanised steel. The mat attaches to the top of the rectangular frame whilst the bottom section forms the base. The retaining wall is attached to the top and bottom sections. Frame: heavy duty 275gsm galvanised 42mm diameter, 2mm thick steel frame.
The frame is made from thick galvanised steel. The mat attaches to the top of the rectangular frame whilst the bottom section forms the base. The retaining wall is attached to the top and bottom sections.
Max user weight 150kgs
- Retaining Wall: The retaining wall ensures the surrounding ground remains firm and prevents soil falling into the hole. This tough and durable retaining wall is made from a 4mm thick eco friendly recycled polypropylene compound. It quickly and easily attaches to the frame using self-tapping screws.
- Springs: 104 x 8.5 inch. High quality German-made 8.5" springs are pre-tensiled and conical in shape to ensure they will not stretch or deteriorate in performance. They are double dipped 'hot' galvanised for added rust protection and have a curl at one end for extra safety.
- Vented Padding Ultra-tough PVC with 30mm foam: The patented Trampolines Down Under vented safety pad allows proper airflow through the pad eliminating 'pad slap" noise, which can occur with other in-ground trampolines, and greatly improves the bounce quality.
- Warranty: Steel frame and retaining wall - 5 years. Jump mat and springs - 2 years. Padding - 2 years. This warranty is for the original purchaser only.
The warranty does not extend to high use situations such as (but not limited to) schools, motels, camping and play grounds, etc.
In-ground trampolines are arguably safer than above ground trampolines as there is no height to fall from.
In-Ground Trampolines DIY Installation Guide:
Step 1. Dig the hole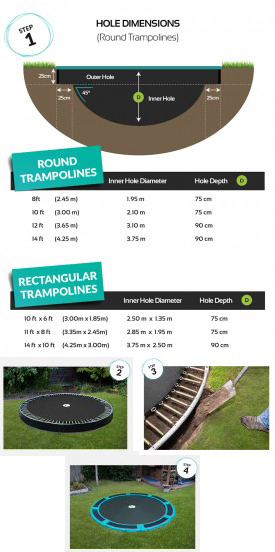
Mark out a hole that is a few inches wider in diameter than your trampoline. This is to give you a little extra room when you place the trampoline in the hole.
Dig out 25cm of soil evenly across the entire hole. Then dig an inner hole in the middle that is 2ft or 60cm less in diameter than the trampoline size in a bowl shape to a depth of 90cm (about 3ft) for 14ft trampolines. This will leave a ledge onto which the trampoline frame will sit.
 TOP TIP:
It's hard to be precise with the hole measurement - the extra few inches will make it easier for you. This extra space will be back-filled at the end. Keep some of your excavated top soil close by the hole for back filling. TOP TIP:
It's hard to be precise with the hole measurement - the extra few inches will make it easier for you. This extra space will be back-filled at the end. Keep some of your excavated top soil close by the hole for back filling.
Step 2. Assemble the frame
Assemble the top and bottom sections of the trampoline frame, attach mat and springs and fix the retaining wall to the outside of the frame.
TOP TIP:
Attach springs at 12 o'clock position, then 6 o'clock followed by 3 o'clock and 9 o'clock first - this will give even tension and make it easier to fit the rest.
Step 3. Site the trampoline into the hole
Lift the trampoline into the hole and place on the ledge ensuring the frame is at the correct height. Then back-fill in the gap on the outside of the frame, compact the soil and re-turf.
TOP TIP:
Use the handle of your spade to compact the soil down as tight as possible when back-filling.
Step 4. Attach the vented pads
Finally attach the TDU vented pads to the frame & you're ready to enjoy your in-ground trampoline!
TOP TIP:
Use a long screwdriver to help push the elasticated toggles down between the trampoline frame and the retaining wall in order to secure the pads to the trampoline.

|